Tuesday, April 29, 2014

Magnolia Bakery Banana Pudding

Skip the cupcakes - all one needs from New York City's famous Magnolia Bakery is their best kept secret: Banana Pudding.

Well, maybe it's not exactly a secret. Magnolia's Banana Pudding came in at #3 in Buzzfeed's “18 Foods Everyone Must Try Before Leaving NYC” - quite the list to conquer. But the people at Magnolia are angels from heaven and published the recipe in their cookbook so that non-NYC dwellers can have their pudding and eat it, too. Also, it tastes so similar the original that it transports me back to New York with every bite.


I remember how my relationship with this Banana Pudding began and I probably always will. I sound completely crazy, but to me, this pudding was one of those life happenings where all the details stick with you forever - like where you were, when, who was with you, what you were doing. I was at the Magnolia Bakery by Rockefeller Center, it was Christmas 2010, we were with our friends Millie and Ty, and we had just finished attempting to see the Rockefeller Christmas tree up close (along with the rest of the city). 

We make our way down 49th Street towards the bakery for some fuel; fighting the crowd is exhausting. The line is long, and once we're finally inside, I beeline it directly to the cupcakes. I'm desperate to see what limited flavor options I'd be forced to chose between, as throngs of tourists and residents alike were all being shuffled in and quickly out of the store. I breeze right by an employee handing out samples of Banana Pudding.

"I don't really like Banana Pudding," I said. I can't even believe the words came out of my mouth. Millie takes a sample, raves about it, and asks for another. Seriously, another sample...? Could Banana Pudding be that good? 

After one spoonful, my question was answered. Yes! Yes it can! Give me more now. These cupcakes are dead to me.


It boggles me that I can still picture this event so clearly in my head, yet I can't seem to remember to give my dog his heartworm pills on the right day.

I had the pudding in the city countless times since that initial meeting by using visitors as a cheap ploy to satisfy my own cravings (you're going to love this place!) or frequently requesting Brian bring home a "treat" after work (pretty please? it's across the street from your office...). I've had the pleasure of recreating it for family and friends many times in Virginia. With every bite, this special dessert always transports me back to Christmastime in New York.


Magnolia Bakery's Banana Pudding: Proof that food feeds the soul as much as it feeds the body.


Magnolia Bakery Banana Pudding

  • 16 oz can sweetened condensed milk
  • 1 1/2 cups ice cold water
  • Small box (3.4 oz) instant vanilla pudding mix
  • 3 cups heavy whipping cream
  • Box Nilla Wafers
  • 4 sliced bananas

1. In the bowl of a mixer, beat sweetened condensed milk and water for about a minute. Add the pudding mix and beat for about two more minutes. Transfer to a smaller bowl, cover, and refrigerate for at least 4 hours or overnight. You want the mixture to be extremely firm.

2. In a large bowl on medium speed, whip the heavy cream until stiff peaks form (I put my metal mixing bowl and whisk mixer attachment in the freezer for five minutes prior...the cream always whips up very quickly this way). Using a rubber spatula, gently fold in the pudding mixture until fully combined and no streaks of pudding are visible.

3. In a large bowl or trifle stand, layer wafers, bananas, and pudding. Ideally, you want three layers but if you go with a larger baking dish you might only have two. Cover tightly with plastic wrap and refrigerate for about 4-8 hours before serving.

Notes
I've found it best to make the pudding/milk/water mix the evening before you plan to serve the pudding, allowing to refrigerate overnight. Perform steps #2 and 3 the following morning and allow the layered pudding to refrigerate for at least four hours. The longer it sits in the fridge, the more soft and spongy the wafers become; just like they are at the bakery.

Friday, April 25, 2014

Merroir: A Tasting Room

"What's your idea of a perfect date?"

If I'm asking you this question and if you know me at all, you'd respond with...


Even though Miss Congeniality pulls in a rather low 6.1 rating on IMDB.com, I still maintain it's one of my favorite most quotable movies out there, along with Mean Girls and Napoleon Dynamite.

So in honor of today's famous date, April 25th, I'm sharing a fabulous date spot: Merroir Tasting Room in charming Topping, Virginia.

Note: I'm using "date" loosely here, as in...you can go here on a date with anyone. Your boy/girlfriend, mother, grandmother, cousin, gal pal, sister, brother...anyone you love spending time with, romantically or not. Just make sure you get down (or up) to this upscale yet casual riverfront seafood restaurant in the spring, summer, or fall and experience this adorable place in all it's glory.


Merrior is a gourmet tasting room overlooking the Rappahannock River where it meets the Chesapeake Bay. With awesome views of the Locklies Marina and the river, the outdoor gravel patio is an idyllic, relaxing setting for enjoying super fresh oysters. There's also a small indoor area with a bar and and deck with a few additional tables.

The prices aren't low, but aren't painfully high (although, I didn't pick up the bill, sooo this is just a guesstimation). Since it's some of the freshest seafood around, I have no doubt you'll enjoy what you pay for. There aren't any fried hush puppies, soggy Old Bay french fries, or endless Iceberg lettuce bowls here. Everything comes out in small portions, priced reasonably from $12-$18, so it was best served tapas style and shared with others. There's a great selection of craft beers, wine, and hard cider. They even have prosecco on tap! It's a lovely place to go for a special occasion (like your mom's 50th birthday) or just to get out of town for a little while.

In addition to oysters, clams, and the like, here are a few other notable dishes from our visit:


Stuffin Muffin: an electrified version of Thanksgiving stuffing, formed into a patty with oysters, onions, bacon, and white gravy. Ayyyy. Recipe here.


Angels on horseback: warm roasted oysters topped with salty country ham and herbed butter. I could have eaten 500.


Grilled Romaine Salad: Wait, why is a salad notable? Because lettuce ... heated on a grill ... cool Caesar dressing, obviously. I read that this menu item was briefly taken off but brought back by popular demand.


Crabcake: Jumbo. Lump. Laden. And hard to beat.


I'm a firm believer that the type of service you experience at a place can affect your entire outlook on the experience. So I'm making a note that the folks here are very nice and aim to please by making an effort to explain dishes, provide recommendations, provide chilled guests with warm blankets (it was March) and allow our party to move to the heated deck when the sun sank behind the trees.

Big deal: the owners of this restaurant, who are constantly being featured in local press, were recently featured in The New York Times dining section in an interesting story about how they're trying bring the oyster trade back to the Chesapeake Bay. In my humble opinion, they're succeeding. Find out for yourself!

Merroir Tasting Room
784 Locklies Creek Road | Topping, Virginia | 23169
Open Year Round
Mon - Thu: 11:30 am - 8:00 pm
Fri - Sat: 11:30 am - 9:00 pm
Sun: 11:30 am - 8:00 pm


Tuesday, April 15, 2014

Classic Eats: Traditional Fudgy Brownies

With oodles of unique, drool-worthy brownies out there these days, I have to wonder if this old-school treat is about to become the new doughnut (which became the new cupcake quite recently, apparently). Are people just so unhappy with traditional brownies now that they have to stick an Oreo in them and call them slutty? From cheesecake-swirled to peanut butter-infused, brownies have the ability to take on a whole new taste and form with the addition of a few ingredients. But sometimes it's worth it to enjoy the original.


Rich and chocolatey, this classic recipe for Traditional Fudgy Brownies tastes so much better than any brownie I've ever had - homemade, store bought, or box brand. No joke. It's probably because I've never had brownies with two sticks of butter before (which is a surefire way to increase the amount of fudgy-ness). These are dense with a moist, intensely chocolatey interior.

The batter made so much that I was able to bake an entire pan of mini "muffin" shaped brownies (above) - PLUS an entire 9x13 pan.


What's your favorite way to eat a brownie?


Classic Eats: Traditional Fudgy Brownies

  • 2 sticks of butter
  • 2 ¼ cups of sugar
  • 4 large eggs
  • 1 tablespoon vanilla
  • 1 ¼ cups of cocoa powder
  • ½ teaspoon salt
  • 1 teaspoon baking powder
  • 1 ½ cups all-purpose flour
  • 2 cups chocolate chips,  optional

1. Grease a 9x13 inch pan and preheat the oven to 350ยบ.

2. Add butter and sugar in a microwave safe bowl. Heat in the microwave, stirring about every 30 seconds, until the mixture is bubbly and smooth (you can also do it on the stove top if you want). 

3. Add in the eggs and vanilla and beat until smooth. 

4. Mix together the cocoa powder, salt, baking powder, and flour and add to the butter mixture, mixing until smooth. 

5. Allow the mixture to cool before stirring in the chocolate chips. 

6. Pour the batter into the pan. Bake for about 28 minutes, or until a toothpick inserted into the center comes out with just a bit of batter still clinging to it.

Wednesday, April 9, 2014

Donut & Fruit Brunch Kabobs

I usually am overly ambitious when planning food for a group setting and figuring out how much food will be necessary. For example, when I made these Greek Lamb Kabobs for Mother's Day, I bought entirely too much meat but ran out of vegetables. A few weeks ago, I made a two pound meatloaf just for Brian and I, with the goal of thinking we'd have some leftovers (hey #mealprep). I quickly learned that two pounds is a ton. I mean, we had meatloaf for days. We hosted a fondue party last New Year's and doubled almost all of the ingredients.

I suppose it's better to have more food than to run out (gasp!), but I also assumed I'd get better at eyeballing portion sizes by now.

Recently, I helped host a bridal shower brunch for one of my best friends. Brunches can be tricky to plan for; everyone has different levels of hunger in the mornings and you don't want to have too much or too little food. As for me, I'm usually starving right when I wake up, but that's another story.

I wanted to incorporate fruit into the menu but wasn't sure a large standard fruit bowl would be the best option, so I made these Donut & Fruit Brunch Kabobs, complete with layers of adorable little Entenmann's Glazed Donut Holes, strawberries, and blackberries.


Healthy fruit nestled around sweet and tasty donut holes makes for easy entertaining!


PS - more on donuts here. I love them.


Donut & Fruit Brunch Kabobs

  • Glazed Donut holes
  • Strawberries, sliced in half and washed
  • Blackberries, washed
  • Wooden skewers

1. Slice the strawberries in half. Assemble each skewer by sliding fruit on carefully, alternating each fruit type along with the donut holes. Leave open space at the bottom 1/4 of the skewer for grabbing and handling.

Thursday, April 3, 2014

DIY Chalkboard Painted Wine Bottles


Have you seen those sarcastic and sassy electronic cards floating around the internet? If you haven't been to their website, I'm sure you've seen them pop up on your Facebook or Pinterest feed; one friend is wishing another a happy birthday ("If I lived closer I would almost definitely try to come out for your birthday") or complaining about their case of the Mondays ("May your Monday be as swift and merciful as an execution").

But there's one in particular that I love:


Unless you're a real rugged mountain woman, this probably applies to you. I know it applies to me! While I like a good hike every now and again, it's pretty hard to beat sipping some vino on an outdoor patio. And it's a win-win if that patio happens to be located at a winery in the mountains or overlooking the river here in Richmond (you get the best of both worlds).

Speaking of wine and patios, I recently did a mini project involving these two things. It's been a little while since I've done a DIY project (blaming the miserable winter), but now that spring has sprung, I've been a lot more active in the DIY realm. Active as in...I've been drinking lots of wine, cleaning the bottles, and spray painting them on my teeny patio.

If you're a wine lover like I am, then you already have 1/3 of the necessary supplies for this project sitting in your fridge or on your counter. So, drink up - and let's get started.

Supplies:

  • Chalkboard spray paint
  • White or colored chalk
  • Dark or green wine bottles, labeled removed

First things first: the wine label has got to go. Soak the empty wine bottles in a sink or bucket filled with warm water and soap for 20 minutes. Take out of the water and scrape the rest of the label off. I used a mixture between my fingers and a dull kitchen knife. Keep rinsing and scraping until the wine bottle is completely clean. Don't forget to remove the foil at the neck of the bottle, too.


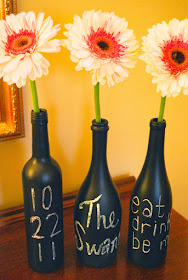
Spray paint your wine bottles with a couple of coats of chalkboard spray paint and let dry. One can was enough to fully paint six bottles for this project. I give each bottle about 3 coats and tried my very best to spray evenly while staying far enough back from the bottle. As much as I tried to avoid it, some drip marks showed up on a few of them (from the paint being too thick when I would spray too close to the bottle).

But they look so cool when they're done that it's easy to ignore the drip marks!

I put the bottles on a circular table and worked my way around it with the paint.


Painting tips:

  • Paint outdoors in an open space on a clear day.
  • Lay down lots of newspaper or cardboard to cover the area. I used cut up paper grocery bags and rotated the bottles in and out while painting.
  • Stand wine bottles up and apply three or four coats for maximum coverage.
  • If necessary, you can flip wine bottles on their side and apply another coat to the bottom.
  • Use dark or green wine glass bottles (they'll hide any chips better than clear glass).

Let the bottles dry completely. 


Then, chalk it up! I found that using thicker chalk (think: drawing hopscotch on a patio) worked much better than the thinner chalk (think: from a classroom). 

I used them for centerpieces at a bridal shower. Instead of displaying table numbers for a seating chart, I (or my sister who has better handwriting than me) decorated them phrases relating to marriage, the couple's wedding date, the bride's new last name, etc.They'd be perfect for as table settings for a dinner party, baby shower, or holiday party - I can't wait to use them all year!


Directions:

1. Wash out the wine bottles and remove labels by soaking in warm water and soap for 20 minutes. Let the bottles dry completely.

2. Cover an open area with newspaper and spray paint the bottles with chalkboard paint. Use two or three coats to make sure the bottle is completely covered..

3. After several hours, once your bottles have dried, give them some personality with chalk. Wrapping twine or burlap in a bow around the top is also a nice addition.

Tuesday, April 1, 2014

Lemon Asparagus Risotto with Seafood

Ah, April is here! I will gladly take this month's rain showers in preparation for next month's flowers, so long as we don't have to see a winter like that ever again. Although spring technically began March 20, Richmond was still experiencing snow and cold, offset by random warm days, well through the end of the month. Polar vortex became a bipolar vortex. Ugh whatever.

All winter I've been waiting for fresh spring produce. Asparagus, one of my favorite veggies, is in its peak season this month and I plan to cook with it as much as possible. My favorite way to enjoy it is baked with salt, pepper, and EVOO, sprinkled with grated Parmesan cheese right out of the oven. But I recently added chopped asparagus pieces into a lemony risotto dish I'd been dying to make. I'm so glad I did - it upped the ante for regular ol' risotto and tasted divine.


Clean, citrusy lemon zest brightens both the asparagus and the seafood, making this a lovely seasonal spring dinner.


Seafood Lemon Asparagus Risotto

  • 3 cups reduced-sodium chicken broth
  • 2 cups water
  • ¾ pound asparagus, trimmed and cut into 1-inch pieces
  • 1 small onion, finely chopped
  • 4 tablespoons unsalted butter, divided
  • 1 ¼ cups Arborio rice
  • ¼ cup dry white wine
  • ¾ pound fresh medium shrimp, peeled and deveined
  • 1 tablespoon grated lemon zest
  • ¼ cup grated Parmesan cheese
  • 2 tablespoons chopped flat-leaf parsley

1. Bring broth and water to a simmer in a medium saucepan. Add asparagus and simmer, uncovered, until just tender, about 4 minutes. Transfer asparagus with a slotted spoon to an ice bath to stop cooking, then drain. Keep broth at a bare simmer, covered.

2. Cook onion in 2 tablespoons butter with ¼ teaspoon salt in a 4-quart heavy saucepan over medium heat, stirring occasionally, until softened, about 5 minutes.

3. Add Arborio rice and cook, stirring constantly, 1 minute. Add wine and simmer, stirring constantly, until absorbed.

4. Stir in ½ cup broth mixture and briskly simmer, stirring frequently, until absorbed. Continue adding broth, ½ cup at a time, stirring frequently and letting each addition be absorbed before adding the next, until rice is creamy and tender but still al dente (it should be the consistency of a thick soup), about 18 minutes. NOTE: depending on your stove top and how evenly it distributes heat, this could take much longer than 18 minutes. I was stirring for closer to 30 minutes and my rice still wasn't perfectly done - my oven stinks. Taste test it throughout; if it tastes hard and crunchy, keep stirring and cooking until it desired tenderness.

5. Stir in shrimp and nestle into the bottom of the pan closest to the heat. Cook until just pink, 3-4 minutes.

6. Stir in asparagus, lemon zest, remaining 2 tablespoons butter, Parmesan cheese, parsley, and pepper to taste. Thin risotto with some of remaining broth if necessary.


Top with Pan-seared Sea Scallops, if desired. Although I love pan-seared scallops and think they deserve their own post, here's a quick and dirty recipe for them - because you definitely want them in this risotto.

Pan-seared Sea Scallops

  • Six fresh sea scallops
  • 1 tablespoon extra virgin olive oil 
  • 1 tablespoon butter
  • Salt and pepper to taste

1. Pat the scallops dry with paper towels.

2. Heat a 10- or 12-inch nonstick skillet over medium-high heat until hot, or for about 5 minutes.

3. Add 1 tablespoon extra virgin olive oil and 1 tablespoon butter. Pat the scallops dry once more and put them in the pan in a single, uncrowded layer. Season with salt and pepper and let them sear undisturbed until one side is browned, about 2 ½ minutes. Using tongs, turn the scallops over and sear until the second side is well browned and the scallops are almost firm to the touch, about 2 ½ or 3 minutes.

4. Once both sides are browned, remove from pan and set on a separate plate. Do not let scallops become too hard to the touch; they will be overdone and taste tough. Adjust searing times as needed.