Wednesday, November 27, 2013

Mimi's Mini Dressing Balls

At Thanksgiving, I've always referred to that delicious breaded magic served with the turkey as "stuffing," never as "dressing." I actually only recently found out this alter ago existed. Mainly because the only homemade dressing ever on my mind is Caesar.

Apparently, the stuffing v. dressing debacle is common between people around this time of year. Dear Abby claims there is no difference between them and the terms are interchangeable. However, others argue that stuffing is (obviously) stuffed inside the bird, whereas dressing is cooked separately in a baking dish.

Whatever you call it, there's no denying it's all delicious. But to be politically correct and to be in line with Brian's grandmother Mimi (the creator of this recipe), they're technically known as Dressing Bites. I'm sure most people have their Thanksgiving menus already planned out, but if there's room for one more side, make this! 


These will have you coming back for seconds until you're forced to loosen your pants and stretch out on the couch for some Z's (before dessert).

They take less than 20 minutes to make and are super easy! We halved the recipe and chopped up one loaf of Pepperidge Farm white bread and mixed it with chopped celery and onion that had been cooking in butter.


Pour in chicken broth and melted butter. Mix all together with salt, pepper, and other poultry seasonings of your choice. I used about two tablespoons of chopped rosemary, sage leaves,  Don't forget the eggs, which will help hold the bread together when it bakes.


Roll them into two inch balls and place on an aluminum lined cookie sheet with cooking spray. Bake at 350 F for about 20 minutes. 

They make great doggie treats, too...


This pairs well with slow-cooked southern green beans. Brian's favorite unhealthy vegetable!  I hesitate to venture into the hot bed of controversy over what is the best way to cook up a mess of country-style green beans (what? you didn’t realize this was an issue? where have you been?), but it’s that time of year.  The simplest way is to cook a can of green beans (whole or cut) and add a spoonful of bacon grease (the size of which depends on the amount of green beans). Allow this to come to a boil, then reduce heat to low and simmer slowly for several hours. Some people throw in onion and a ham bone or bacon for extra flavor.


Happy Thanksgiving!


Mimi's Mini Dressing Balls
makes 32 bites

  • 2 loaves country white bread, cut up into ½ inch pieces
  • 1½ cup celery, diced 
  • 1½ cup onions, diced
  • 2 cups chicken broth
  • 3-6 eggs, beaten
  • Salt and pepper to taste
  • 1-2 sticks butter, divided by half
  • ¼ cup chopped rosemary, thyme, sage mix (optional)

1. Sauté celery and onions in a 1/2 stick of butter over medium high heat for 10 minutes. Remove from heat and let cool.

2. While vegetables are cooling, slice 2 loaves of country white bread into ½ inch cubes. Melt ½ - 1 whole stick of butter in a separate cup.

3. In a large mixing bowl, hand mix bread, vegetables, butter, and chicken broth together. Slowly ladle in beaten eggs; you want just enough to hold the bread together, but not too much. You might not use it all.

4. Once mixed, form into two-inch balls. Line a baking sheet with aluminum foil and spray with cooking spray. Place onto baking sheet and bake at 350 degrees for 15-20 minutes. If necessary, pour a teaspoon of chicken or turkey broth on them before baking. 


Southern Green Beans

  • 3 (14 ½ ounce) cans green beans (or one 50 ounce can)
  • 1 large spoonful bacon grease
  • Salt and pepper to taste

1. Mix together in a large covered pot and bring to a boil. Turn down the heat to low. Simmer slowly for several hours until beans are very tender. 

Thursday, November 21, 2013

Chicken with Shallot and Mustard Cream Sauce

With Turkey Day just a week away, I know that bird is the only thing on anyone's mind right now (and rightfully so). But you'll have to please pardon my interruption as I share one of my favorite chicken recipes with y'all: Chicken with Shallot and Mustard Cream Sauce.

I like mustard, but sometimes it can be a bit overpowering. A mustard cream sauce might not sound ideal at first mention, but when there's cream, wine, chicken broth, and mild shallots involved, all these players work together to mute the mustard slightly, yet still produce a bold, tangy, flavorful sauce.


A sauce that just happens to be even better when it's poured over chicken. To get there, you'll need the ingredients below...


Cut the chicken breasts in half lengthwise so that you have four smaller, thinner chicken cutlets. Salt and pepper both sides.


Heat two tablespoons each of oil and butter in a large skillet over medium-high heat. Cook cutlets on both sides until nice and golden brown and cooked through.


Remove chicken from the skillet and keep on a plate, leaving the pan on the stove. Then, reduce the heat to medium. Add the shallots and garlic to the pan and saute. Pour in the wine and cook until it's reduced by half.


Add in the mustards. I have used Dijon, Spicy Brown, and Grainy garlic kinds.


Stir to combine, then pour in about ¼ cup cream. Stir in ¼ chicken broth, adding more if the sauce seems too thick. Taste sauce and adjust whatever you think it needs.


Add chicken breasts back to the pan, nestling them into the sauce. Allow sauce to cook for another few minutes, shaking the pan if needed to move things around.

Serve chicken over rice pilaf, spooning the sauce over the top. Add a simple green salad, or if you're in the mood for cooked vegetables, try pairing this with roasted broccoli or roasted Brussels sprouts.


This would be a great special occasion meal. Because the chicken is sliced so thin, it takes less time to cook than baking, so you've got a hot, delicious meal in less than 30 minutes.


Chicken with Shallot and Mustard Cream Sauce
adapted from The Pioneer Woman

  • 2 boneless, skinless chicken breasts
  • 2 tablespoons olive oil
  • 2 tablespoons butter
  • 3 whole garlic cloves, minced
  • 1 medium shallot, diced
  • 1 cup white wine
  • 1 teaspoon (heaping) Dijon Mustard
  • 1 teaspoon (heaping) Grainy Mustard
  • 1 teaspoon Spicy Brown Mustard
  • ¼ cup heavy cream
  • ¼ cup chicken broth
  • Salt and pepper, to taste

1. Cut the chicken breasts in half lengthwise so that you have four smaller, thinner chicken cutlets. Salt and pepper both sides.

2. Heat oil and butter in a large skillet over medium-high heat. Cook cutlets on both sides until nice and golden brown and cooked through. Remove chicken from the skillet and keep on a plate.

3. Reduce the heat to medium. Add the shallots and garlic to the pan and sauté it for a minute, stirring to make sure it won't burn. Next pour in the wine and cook until it's reduced by half.

4. Add in the mustards and stir to combine, then pour in the cream. Stir in chicken broth, adding more if the sauce seems too thick. Taste sauce and adjust whatever you think it needs. 

5. Add chicken breasts back to the pan, nestling them into the sauce. Allow sauce to cook for another few minutes, shaking the pan if needed to move things around.

6. Serve chicken over rice pilaf, spooning the sauce over the top.

Tuesday, November 19, 2013

The Daily Kitchen & Bar

Carytown has seen a bevy of restaurants come and go from its eclectic streets. The Daily Kitchen & Bar opened up on Cary and Sheppard Streets in July, and I hope this is one's here to stay.


Thursday, November 14, 2013

Quick and Easy Fruit Crisp


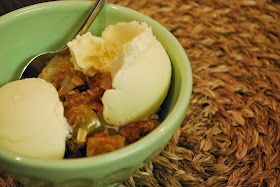
If you're in the mood for an absolutely delicious, autumn (or summer) dessert, look no further. Fruit crisp is your answer. I recently made this recipe with apples, but it's great in the summertime when peaches are in season as well (also good with cherry, pineapple, blueberry, or any other fruit you'd like). It seems complicated, but it's so simple. There's no dough or crust to deal with...


...just warm, baked apples (or other fruit) topped with sweet brown sugar, crunchy oats, and smooth butter.

Fruit and oats sounds like a wholesome dessert to me, don't you agree?


Top it with a scoop of country vanilla ice cream and you're in business!

Your house will smell better than any old apple-scented Yankee candle, too.


Fruit Crisp

  • 4 cups sliced tart apples (Honeycrisp or Granny Smith)
  • ¾ cup packed brown sugar
  • ½ cup flour
  • ½ cup oats
  • ¾ teaspoon cinnamon
  • ¾ teaspoon ground nutmeg
  • ⅓ cup margarine or butter, softened 

1. Heat oven to 375 degrees. Arrange apples in greased 8x8x2 square pan. Mix remaining ingredients and sprinkle over apples.

2. Bake until topping is golden brown and apples are tender, about 30 minutes. Serve warm with ice cream.

Note: Use ⅔ cup brown sugar if using canned fruit. Can substitute apple with cherry, peach, pineapple, blueberry (add 2 tablespoons lemon juice for blueberry)

Tuesday, November 12, 2013

Classic Baked Acorn Squash


So I'm going to continue with the theme of delicious fall recipes for y'all. Or should I say winter? Thanks to our friend who stopped by for a visit, mr. arctic front, Richmond is f-r-i-g-i-d. 

This classic baked acorn squash tops my list of favorite fall, comforting recipes. Someone first made it for us a few years ago, when we were on a weekend getaway in the Catskill Mountains of upstate New York, and our autumns seriously haven't been the same since. 

I dream about this squash in the summer months. And, its as easy as it comes. 

Halve a large acorn squash from top to bottom. 


Use a spoon to hollow out the center, removing the seeds. 


Acorn squash must be related to pumpkins, because they smell exactly the same. Don't be freaked out that you're about to eat a jack o'lantern - you aren't - and these are way better.

Then use your knife to cut slits into the sides of the squash. You want them to be deep enough, but not so deep that the outer edge of the squash is cut.


Fill the hollow center and sides with butter, brown sugar, and maple syrup, and top with coarse salt. 


Add a little water into a baking dish and bake for a little over an hour. Serve straight out of the oven, but be sure to spoon the butter that's melted into the center over the slits you created.


Perfectly even butter coverage is essential, right?

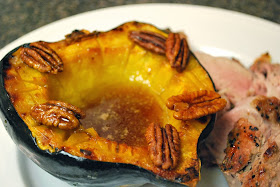
The result is a soft, sweet, flavorful squash that’s dripping with all the good things in life. This time, we added on candied pecans for a welcomed crunch. 


We grilled Trader Joe's Peppercorn-Garlic Boneless Pork Tenderloin to go with it. This thick cut of pork brought the perfect spicy contrast to our sweet-as-dessert squash.


The last step is self-explanatory...

Spoon into mouth. Repeat until full. Enjoy.


Classic Baked Acorn Squash
for two

  • 1 large acorn squash
  • 1 tablespoon butter, softened 
  • 2 tablespoons brown sugar
  • 2 teaspoons maple syrup 
  • Dash of salt 
  • Candied pecans for topping (optional)

1. Preheat oven to 400 degrees. Using a strong chef's knife, cut the acorn squash in half, lengthwise, from stem to end. Use a spoon to scoop out the seeds and stringy stuff in the center of each half. Score the insides of each half several times with a sharp knife.

2. Place each half in a baking pan, cut side up. Add about a ¼ inch of water to the bottom of the baking pan so that the skins don't burn and the squash doesn't get dried out.

3. Coat the inside of each half with ½ a tablespoon of butter. Add a dash of salt if you are using unsalted butter. Add a tablespoon of brown sugar to the cavity of each half. Dribble on a teaspoon of maple syrup to each half.

4. Bake in the oven for 60-75 minutes, until the squash is very soft and the tops are browned. Do not undercook. When finished, remove from oven and let cool a little before serving. Spoon any buttery sugar sauce that has not already been absorbed by the squash over the exposed areas.

Friday, November 8, 2013

Virginia Hikes: Humpback Rocks


Last weekend, Brian and I were lucky enough to catch the last of the fall foliage in the mountains before everything turns - well - brown and grey, for what will seem like an eternity. We wanted to do a quick hike that wasn't too far from Richmond, so we drove up I-64 West to Humpback Rocks. It's right off the Blue Ridge Parkway, which is ranked as one of the most beautiful drives in the country.

Although the hike to the Rocks was only 1 mile, it was extremely tough! We both exercise frequently and were truly huffing and puffing throughout most of the way to the top. Afterwards, I expected to be sore in my legs, but ended up being sore on my torso and sides...

So for this hike, you definitely use muscles you wouldn't expect!

The views at the Rocks are spectacular looking west onto the Shenandoah Valley and north to Shenandoah National Park. Once you reach the rocks, you can continue on 2 more miles to a picnic area. This was bizarre to us because we simply couldn't fathom going much further at that steep incline. Call us pansies, but we, like most people, just picnicked/took a breather at the Rocks.

We just ordered Hiking Virginia through Amazon.com and are excited for spring to be here so we can continue exploring the Commonwealth - from such great heights. 

Enjoy the pictures!